
Fonts
These vary. Time Magazine uses initial caps for titles and serif font for both titles and body text. Washington Post does the opposite. My textbook said browsers default to Times or Times New Roman. It also says PCs have Arial and Times New Roman but not Helvetica or Times, and Macs have Helvetica and Times but not Arial or Times New Roman. My textbook (187) says Times can be hard to read because it is tight, and Georgia is its wider alternative. Model after Washington Post., using native fonts. Don’t even pick a font face. I am not here to show style. I am here to get my readers to stay and read, forgetting they are even on a web page.
Serif fonts for titles.
Sans serif body text.
Sentence case for titles.
Consistency helps users navigate. Inconsistency makes people go away.
Always style fonts from the customizer.
Never style fonts in the post or theme builder.
Font Sizes
Divi’s theme customizer only allows you to adjust the H1 tag. All the lesser tags are automatically adjusted proportionate to your H1 setting.
H1 and H2 tags are the same size. This is standard WordPress design. I don’t know why.
Picture sizes
Ideally, I will only have one picture size. I would like it to be landscape. However, picture content often doesn’t cooperate with this.
Orientation
Landscape
All my client logo pictures look great at landscape because I made them that way. But my data analysis funnel picture didn’t work that way. Ala Although square pictures
Portrait
I don’t like portrait for anything. Computer screens are landscape, so a portrait picture forces text into a newspaper-skinny column. I guess that’s not bad if the picture is really tall and skinny, like a sidebar. However, this is terrible on mobile because you have to scroll past the whole picture to see any words.
Square
I started out with square pictures because I wanted them to behave like a thumbnail on the left edge of every product and post in archive view. However, once you click on those products and posts, there were two problems with square images:
Desktop header awkward
Mobile screen hog
Page template
1/2/2024
I made a page for each item in the site navigation menu. Everything else is a post.
I made the page template in Divi Theme Builder. The template mimics the post template for sitewide consistency, and could have even used the post template for it. However, my post content is 100% edited in WordPress. The pages have category blogs on them, which I could not customize enough in the WordPress editor.
To create a new page:
- Create and save the empty page in WordPress.
- Click Use the Divi Builder at the top of the page.
- When Divi offers to build from scratch or use a template, click Build From Scratch.
- The page opens up with the template applied.
- By default, Divi allows you to enter and edit templates while you are working on a page or post. I could not find a way to edit the unique page content without editing the template. I finally found you can disable Theme Builder Template Editing. Be sure to leave disabled.
- Change the view to skeleton(?) view.
- Add a new section below the existing one.
- I wasn’t able to delete that existing one from the template, for some reason.
- A new section appears and offers modules to add. Instead,
- Click the other tab (Library).
- From the Divi Library, select Section – ppv blog grid.
- My highly customized blog is inserted with All Categories as it’s filter.
- This section also includes the code module that contains the highly customized styling for this blog grid (below).
- Avoid the ppv-blog-grid that is in Divi cloud library. It is outdated and needs to be deleted.
- In the settings of the blog module, change the filter to the category you want on this page.
- Delete the top section that was there when you created the page.
- Click save on the blog module, then save and view the page.
PPV blog grid
I created this as a template for all blogs. I could not figure out how to make it a template because I have to change the filter every time I use it. Instead, I had to make it a static template. If I ever have to change this template, I have to go back and re-insert it everywhere it is used if I want consistency.
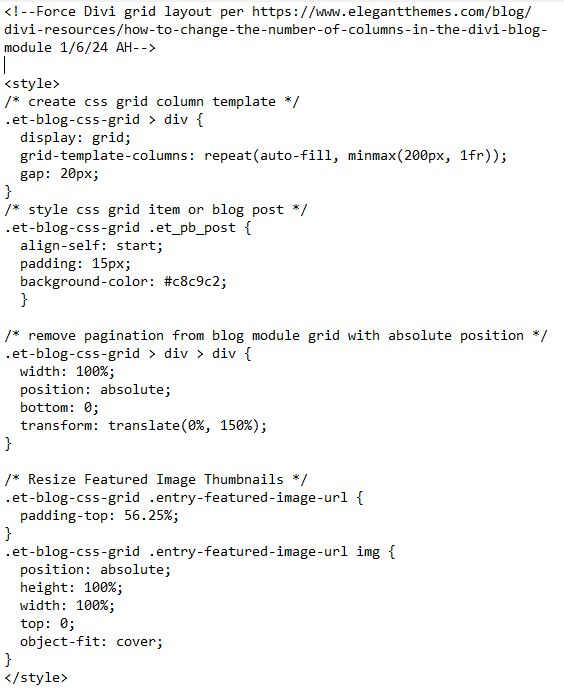
Divi’s grid layout wasn’t working for me from within my post and page template. I resorted to Elegant Theme’s workaround, which is a small batch of CSS housed in a code module on the page template. Here is the code snippet. WordPress wouldn’t let me paste it directly, so this is a snapshot:
Post template
Backups
There are plugins for backing up, but I want to do it manually. In fact, I can’t see why anyone would want to add a plugin when this is so simple. The process looks identical among all the tutorials I’ve found. But the most clearly written comes from this video:
- Website Contents Backup
- In cPanel File Manager, create a zip file for the site’s main folder.
- Download the zip file.
- Database Backup
- In phpMyadmin, export the database.
- Download the SQL file.
WordPress said industry standards is three copies in different places.
Here is a more complete version of the above:
How to Manually Back Up Your WordPress Files
NOVEMBER 20, 2020 BY MILOS BOGDANOVIC
When you’re developing your website, it is extremely important to regularly backup files on your server. This enables you to easily get your last working site’s version up and running in no time if anything unexpected happens. The backup process can be automated with the help of various plugins or server options, but it can always come in handy to know how to do it manually.
Since your website files are located in the File manager console on your server, first you have to access the cPanel. Not all servers use the cPanel, so if you are not sure which platform your hosting package is offering, contact your hosting provider for more information.
Before you start with the backup process, create a new folder on your computer. To keep things organized, we recommend that you adhere to the following naming pattern: prefix “backup”, the name of your website, and the date of this particular backup.
Backup Files Using cPanel
After you log into cPanel, navigate to the File Manager settings in the dashboard.
File Manager
In the File manager, locate and open the folder public_html. If there is more than one domain on the server, mark the folder with the domain name of the website you want to backup. Right-click on it and select Compress.
Mark the folder with the domain name
You can also find the Compress option in the File Manager’s toolbar. By selecting the Compress option, you’ll open the window that contains additional settings.
Compress option
Tick off the zip archive option, enter the name of the file and then click on the button Compress Files(s).
The compression duration depends on the size of your files. The end result will be a zip file. Download it from your server and save it in the folder you previously created for backup files.
Save zip file
If you want to copy individual files rather than the entire folder, click on the first file in the folder to mark it. Holding the SHIFT button on your keyboard, scroll down and select the last file you want to mark. Right-click on the selected files and click on Compress:
Selected files and click on Compress
You’ll open a new window where you’ll select the zip archive option to compress files. Enter the name of the zip file and the name of the server folder where you’ll save it. If you don’t specify the location, a new folder with the zip file name will be automatically created:
Select the zip archive option to compress files
If you follow the instructions, the end result will be a zip file marked with the date when the backup was performed.
Zip file marked with the date
Download the zip file to your computer, and place it within the folder you previously created for this purpose. It is recommended that you delete the backup file from the server after the download so you don’t use up space unnecessarily.
How To Make a WordPress Database Backup Manually
SEPTEMBER 1, 2020 BY IGOR BJELICA
WordPress stores all the information and changes you make to your website within its central database. This database, consequently, becomes an integral part of the backup process which allows you to protect and store changes to your WordPress site. This way you can always be prepared with a working version of the database should anything happen to the live version.
You can backup the database manually or using a WordPress backup plugin. In this article, we will show you how to create a copy of the database manually. However, if you prefer using plugins, we suggest you first explore the top backup plugins on the market.
There are multiple ways to make a manual WordPress backup of your database. A couple of them utilize your hosting’s cPanel functionalities, namely the access to phpMyAdmin and your database. The other way requires you to use the Backup Wizard, an automated functionality provided by some hosting packages.
How to Backup WordPress Database Using phpMyAdmin
To start the backup process, you need access to the database. If you’re working on a live server, you will either have to contact your hosting provider or access your hosting’s cPanel. If you choose the second option, navigate to phpMyAdmin.
phpMyAdmin dashboard
On the left-hand side of the page, you will see a list of your databases. Select the one you need.
[Amy: the ppv database is on the wp-config file, which I downloaded 1/7/2024.]
This will open an overview of its tables.
Don’t be confused if the prefix for the tables is different. WordPress sets “wp_” as the default prefix, but there are a few ways to change this table prefix within your database.
When you choose the database you want to backup, click on the Export tab. You can choose the Quick or Custom export methods. If you’re not familiar with this process, go with the Quick export method.
Export tab
Leave the format as SQL and click the Go button. This will start the download of the database file with the .sql extension. Save it to a local file and you will have a database WordPress backup on hand.
If you’re a more experienced WordPress user, you can choose the Custom export method. With this type of export, you’ll be able to save a lot more options from the database. This is why the Custom export method is recommended for larger websites that have robust settings and dozens of WordPress plugins.
Custom export method
If you want to customize the settings for your backup version, here are some of the options that will come in handy.
Firstly, the custom export option allows you to choose the tables you’d like to incorporate into the backup file. For example, if you have a WordPress plugin that is not particularly important to the functionality of the website, you might want to exclude it from the backup process as it would make the file unnecessarily bulky. This is a practical decision if you intend to make regular, perhaps weekly or even daily, WordPress backups. Any storage space that you could save using this option will greatly improve and speed up the backup process.
The second section of the Custom export feature is Output. This is a set of options that enables you to fine-tune how the backup will be packaged. In other words, you can choose a custom name for the file, its character set and the way you’d prefer it to be compressed. For example, it is helpful to change the file name template to include the date and time stamps. This will allow you to easily navigate through them within the chosen directory. This template is constructed as follows:
@DATABASE@_%Y-%m-%d%H-%M-%S
The names of the created files will consist of the database name, followed by two underscores – the year, month, day, and time of the extraction separated by dashes.
Other options include exporting tables separately and setting a limit to the size of the tables. Unless you have a clear idea of how you want your backup file to look like, do not change the default values. However, if you’re going to backup your WordPress site often, take some time to learn more about these customizing options. It will make the process easier and quicker.
When you choose the optimal setup for your backup, click on the Go button and the file will be downloaded to your computer. Make sure to create a proper folder for all of the WordPress backups for better organization.